I know how frustrating water problems can be in your basement. You’ve probably seen those damp walls, smelled that musty odor, or worse, dealt with actual flooding. Trust me, I’ve been there too.
Waterproofing isn’t just about keeping things dry anymore. It’s about protecting your biggest investment and your family’s health.
When it comes to RadonSeal vs Drylok, which one actually works?
I’m going to give you the straight facts about both products. No marketing fluff, just real talk about what each one does best.
The Core Differences of Radonseal vs Drylok
RadonSeal vs Drylok is a common comparison for homeowners looking to seal their basements.
RadonSeal has one main goal, stopping radon gas from seeping through your concrete. It’s a penetrating sealer that goes deep into the pores of concrete and masonry.
Yes, it blocks some water, too, but that’s more of a bonus feature. I think of it as radon protection first, moisture control second.
Drylok, on the other hand, is all about waterproofing. It’s designed to create a barrier that keeps water out of your basement walls. Some versions claim to reduce radon, but let’s be honest, that’s not their strong suit.
| Feature | RadonSeal | Drylok |
|---|---|---|
| Formulation & Application | Penetrates up to 4″ into concrete; spray-on; looks like water | Surface coating, thick roller application; dries white and chalky |
| Performance | Lasts 20+ years; rarely needs reapplication | Lasts 5–10 years; prone to peeling/cracking under pressure |
| Best Surfaces | Old, porous concrete; cinder blocks | Smooth surfaces; needs etching for fresh concrete |
| Durability | Deep penetration = long-term results | More maintenance; variable performance on blocks |
Understanding Details of RadonSeal and Its Working
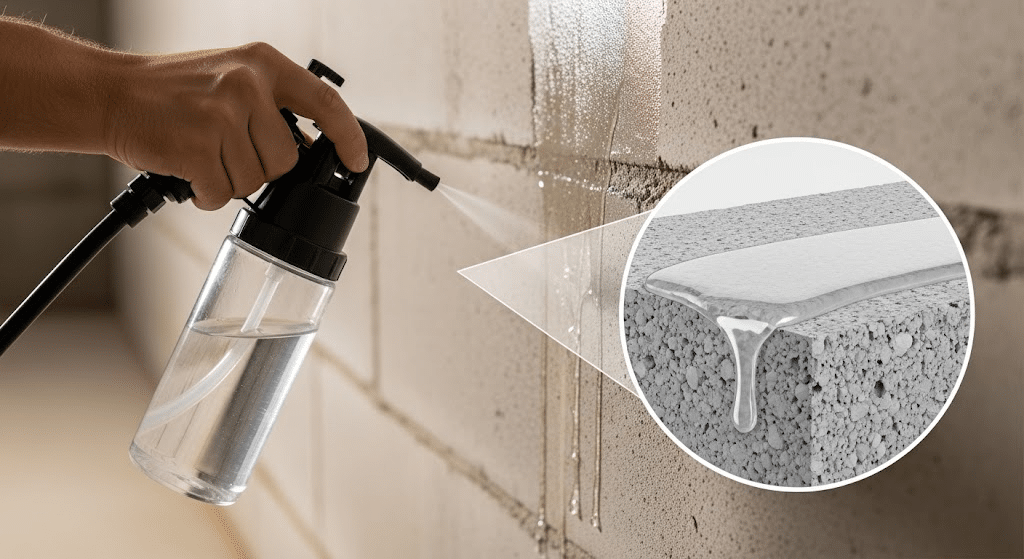
RadonSeal is a liquid concrete sealer made from sodium silicate and other penetrating compounds. Think of it as a chemical treatment that turns your porous concrete into a much denser, gas-tight barrier.
Here’s how it will work for you: When I spray RadonSeal on their concrete, it soaks deep into the pores and reacts with the lime in the concrete. This creates a gel-like substance that fills all those tiny spaces where radon gas would normally sneak through.
The whole process takes about 30 days to fully cure for my client’s project, but I’ve seen it start working within hours.
What makes RadonSeal different is that it doesn’t just coat the surface – It actually changes the concrete itself. Once it’s cured, you can’t scrape it off or peel it away because it’s become part of the wall.
Best Use Cases: RadonSeal works best when you’re dealing with radon problems in basements with concrete or masonry walls. I’ve had great success using it on:
- Older concrete basement walls (the more porous, the better).
- Cinder block foundations.
- Concrete floors with radon issues.
- Crawl spaces with concrete surfaces.
But here’s where it struggles: RadonSeal won’t fix major water leaks or flooding issues for my clients. If you have water streaming down your walls, this isn’t the solution. It also doesn’t work on painted surfaces or previously sealed concrete. The sealer needs direct contact with raw concrete to do its job.
I’ve also learned it’s not great for stopping water vapor in really humid conditions. It’s more about gas control than moisture control.
For more information and purchasing options, visit the official RadonSeal website.
Detailed Overview of Drylok and Its Working
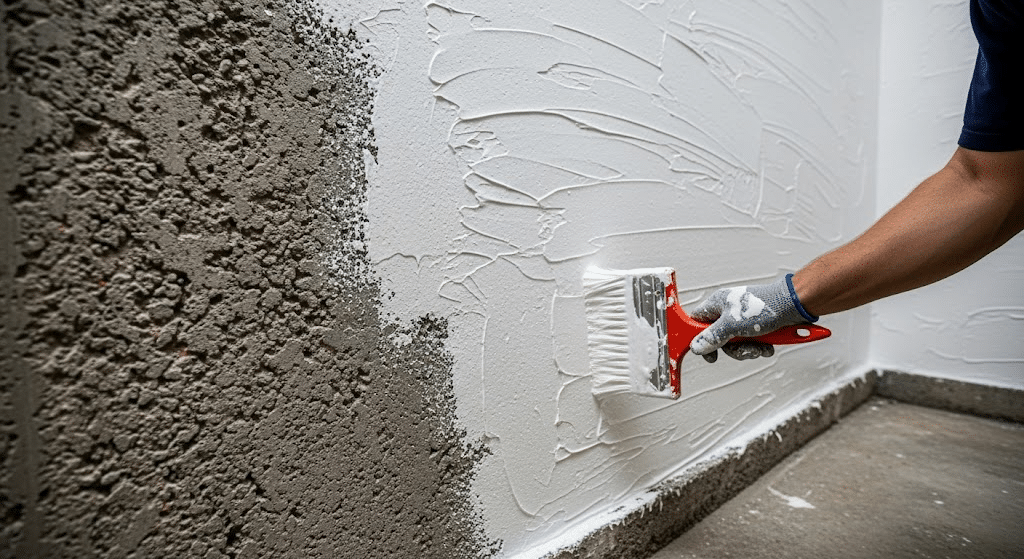
Drylok is a thick, latex-based masonry waterproofer that creates a physical barrier on concrete and masonry surfaces. Think of it as heavy-duty paint that’s designed to keep water out instead of just looking pretty.
1. The original Drylok is an acrylic latex formula that you roll on like thick paint. It dries to a white, slightly textured finish that can handle some water pressure. I’ve used the original version hundreds of times it’s reliable for basic waterproofing jobs.
2. Drylok Extreme steps things up with a more advanced latex formula. It’s thicker, sticks better, and can handle higher water pressure than the original. I reach for Extreme when I’m dealing with problem walls that have failed before. It costs more, but it’s worth it for tough situations.
3. Then there’s Drylok Pro, which is siloxane-based instead of latex. This one actually penetrates into the concrete a bit while still forming a surface barrier. I like Pro for exterior applications because it breathes better and handles freeze-thaw cycles without cracking.
Here’s how they all work: You apply them thick (really thick) with a special masonry roller. The coating fills small cracks and pores, then hardens into a waterproof membrane. Most jobs need two coats, and you have to wait 4-6 hours between coats.
Ideal Use Cases
- Interior basement walls with minor to moderate water seepage through concrete or cinder block.
- Below-grade concrete walls where you can’t access the exterior for proper waterproofing.
- Crawl space walls that show signs of moisture but don’t have standing water issues.
- Above-grade masonry walls that need weather protection and water resistance.
However, here’s where it struggles: Drylok often fails to handle major water problems and frequently disappoints homeowners who expect it to manage flooding or streaming water. It also cracks and peels when applied too thick, and won’t work properly over dirty or painted surfaces.
For more information and purchasing options, visit the official Drylok website.
Which is Best According to Your Project?
Let me break this down with a simple table that covers the most common scenarios I see:
| Your Situation | Best Choice | Why |
|---|---|---|
| Radon levels above 4 pCi/L | RadonSeal | The primary purpose is radon reduction |
| Minor water seepage, no radon issues | Drylok Original | Cost-effective for basic waterproofing |
| Heavy water problems + radon | RadonSeal first, then assess | Address radon first, major water needs drainage |
| Tight budget, minor moisture | Drylok Original | Lowest upfront cost |
| Long-term solution needed | RadonSeal | Lasts 20+ years vs 5-10 for Drylok |
| Painted/sealed concrete | Drylok | RadonSeal won’t penetrate sealed surfaces |
| New concrete (less than 30 days) | Wait, then RadonSeal | Let the concrete cure first |
| High humidity, no major leaks | Either works | Choose based on other factors |
Common Mistakes to Avoid
Many homeowners make costly mistakes when using basement sealing products.
When comparing Radonseal vs Drylok, it’s important to understand the strengths and limitations of each option before starting your project.
- Wrong product for the job – Using Drylok for radon problems wastes money. Drylok handles moisture, not radon gas. RadonSeal works for radon, but neither product fixes major water problems or flooding.
- Poor surface preparation – Applying products over old paint, dirt, or dust prevents proper adhesion. Both products need clean, solid concrete surfaces to work effectively.
- Application errors – Too much RadonSeal wastes money since concrete absorbs limited amounts. Thick Drylok coats crack and peel. Rushing between coats causes poor adhesion and product failure.
- Timing mistakes – New concrete (under 30 days) won’t absorb RadonSeal properly. Both products need patience and proper curing time to deliver lasting results.
Drylok vs Flex Seal: Another Waterproofing Solution to Consider
While we’ve covered RadonSeal and Drylok extensively, you might also be wondering about Flex Seal and how it compares. Flex Seal Liquid is a liquid rubber coating that creates a waterproofing solution for various surfaces, including basement walls and foundation wall areas.
Unlike Drylok’s masonry-specific formula, Flex Seal works on multiple materials and forms a flexible seal liquid barrier. This liquid rubber product is easier to apply but typically doesn’t penetrate as deeply as traditional waterproofing products. For serious basement waterproofing needs, Drylok remains the better choice, but Flex Seal can handle quick patches and prevent water damage in less critical areas. When dealing with basement water issues, consider your specific needs – Drylok for permanent basement protection, Flex Seal for versatile temporary fixes.
To Conclude
After breaking down RadonSeal vs Drylok, here’s what it comes down to: know your enemy first. Test for radon, check your water situation, then pick your weapon.
I’ve seen too many people grab the wrong product and waste time and money. RadonSeal wins for radon problems and long-term concrete protection. Drylok takes the crown for basic waterproofing on a budget.
Get that radon test kit, assess your moisture levels, and stop second-guessing yourself. Your basement problems won’t fix themselves, but now you know exactly which product will actually work.
Ready to get started? Your healthier, drier basement is waiting.