Want fresh vegetables growing right in your backyard? I know that feeling. You’re excited to start gardening, but your soil quality isn’t great.
Maybe it’s too rocky, too compact, or just plain difficult to work with.
Using DIY raised garden bed layers solves these problems fast. You control the soil, drainage, and growing conditions. Your plants thrive because you build the perfect environment from the ground up.
I’m going to show you exactly how to layer your DIY raised garden bed. You’ll learn which materials work best and why each layer matters for healthy, strong plants.
Let’s get started.
Why Layering a Garden Bed is so Important
In the beginning, it felt simple, just soil in a box and done, but the plant struggled, and I couldn’t figure out why.
Then I learned about proper layering, and everything changed. Layering your raised bed isn’t just about stacking materials randomly.
What proper layering does for your garden:
- Water flows through easily without pooling at the roots. This prevents rot and keeps plants healthy.
- Different layers break down over time, feeding your plants naturally. You won’t need as much fertilizer.
- A good bottom layer blocks weeds from creeping up into your bed. This saves you hours of pulling weeds later.
- Layered beds warm up faster in spring. The decomposing materials create heat that helps plants grow earlier.
- You use fewer resources because the bed maintains itself better. Healthy soil means fewer problems down the road
Different Types of Raised Beds
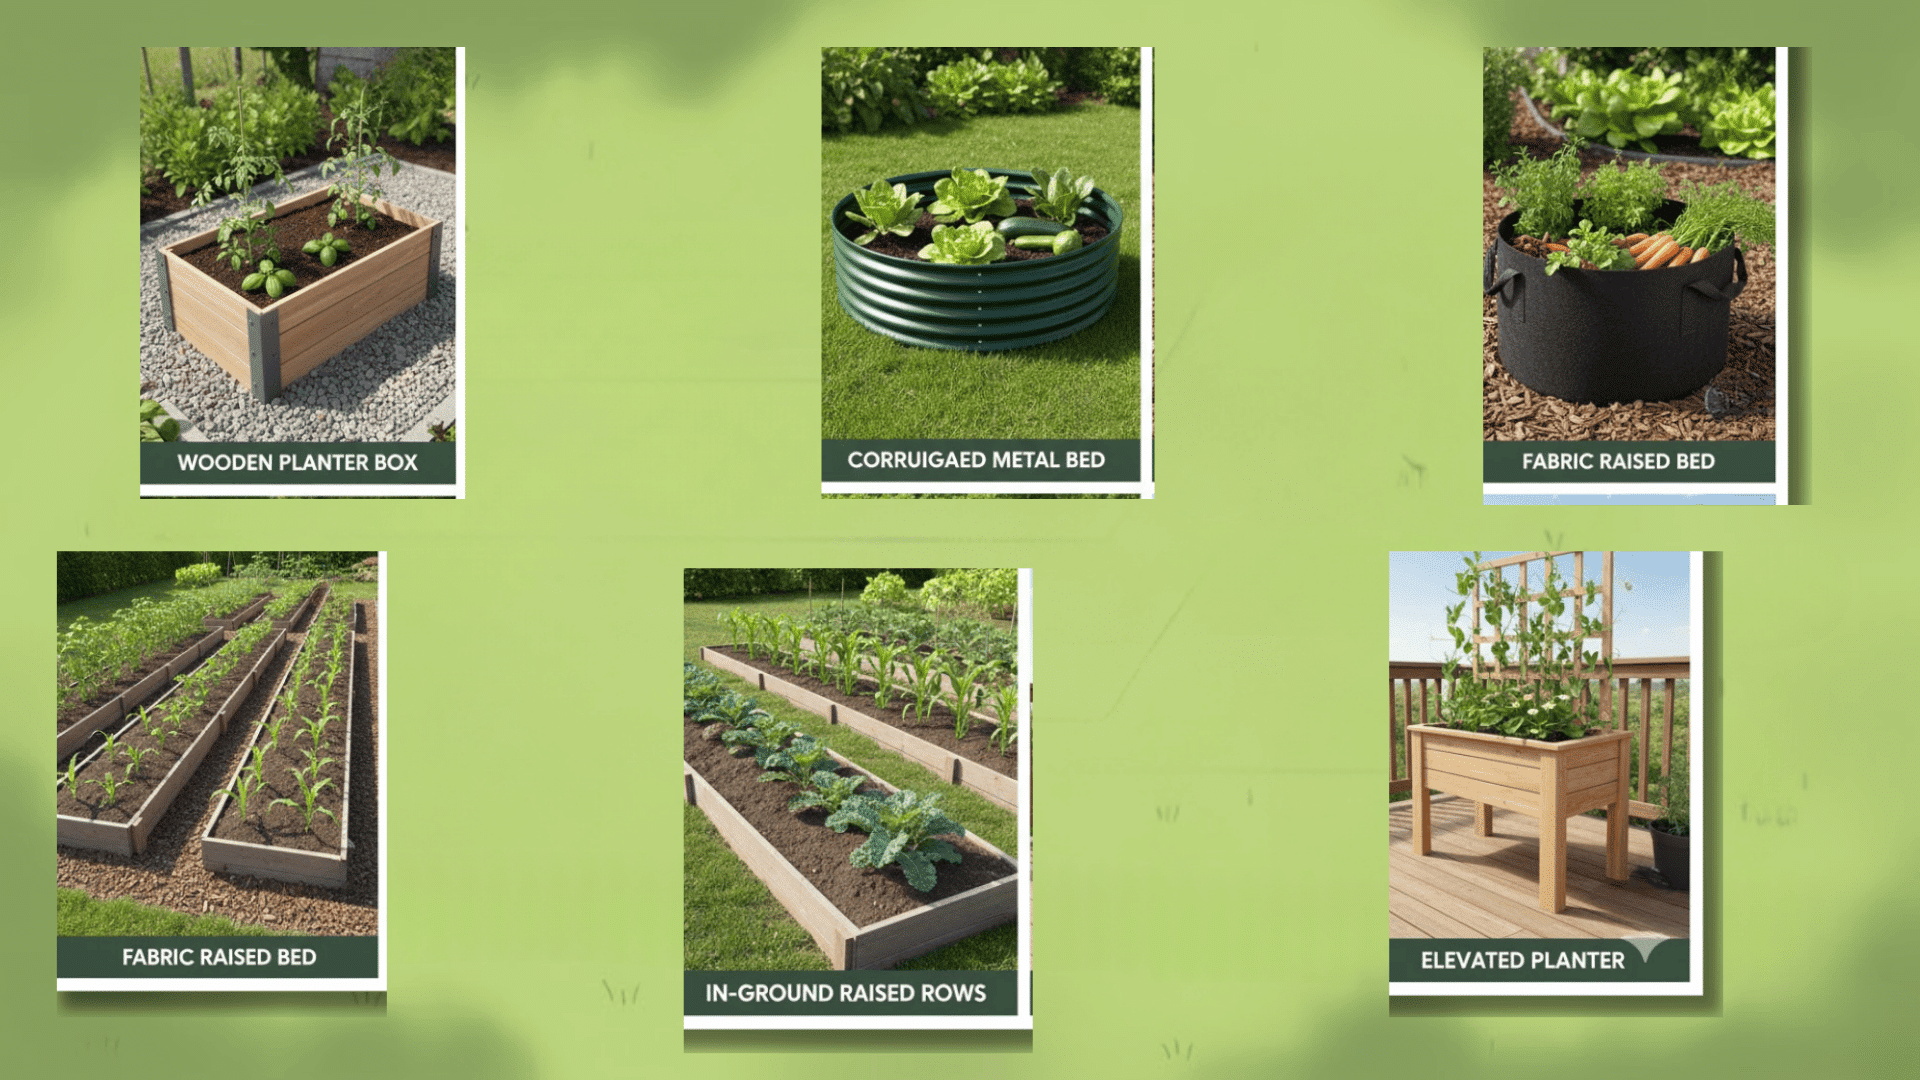
Choosing the right bed style is important before you start layering. Different raised bed styles suit different gardening needs.
Each type has unique benefits and drawbacks.
1. Wooden Raised Beds: Cedar and redwood last longest without rot. Pine costs less but decays faster. Wood holds moisture well and looks natural in yards.
2. Metal Raised Beds: Galvanized steel lasts 20+ years without maintenance. Heats up fast in spring. It can get too hot in summer, damaging edge roots.
3. Fabric Raised Beds: Lightweight and portable for easy moving. Drains extremely well but dries out quickly. Fabric breaks down after 3-5 years of use.
4. In-Ground Raised Rows: Cheapest option with no materials needed. Simply mound soil into rows. Edges erode and require annual rebuilding for best results.
5. Elevated Raised Beds: Sits on legs at waist height. No bending required while gardening. Dries out fast and costs the most to build.
Grab the Materials and Tools Needed
Getting organized before you start makes the whole process smoother. Having everything ready saves trips to the store and keeps momentum going.
| Material | Tools |
| Compost | Shovel |
| Mulch | Rake |
| Topsoil | Wheelbarrow |
| Leaves or straw | Gloves |
| Aged manure | Utility knife for cardboard |
| Sticks and branches | Garden hose |
| Cardboard or newspaper |
Step-by-Step DIY Raised Garden Bed Layers Method
Step 1: Prep the Bed Area
I always clear the ground where the bed will sit first. Remove all grass, weeds, and rocks from the surface.
Use a garden fork to loosen the soil underneath about 6 inches deep. This improves drainage and lets roots grow deeper.
Level the area so your bed sits flat. Uneven ground causes water to pool in low spots. I check the level with a long board to make sure everything’s even.
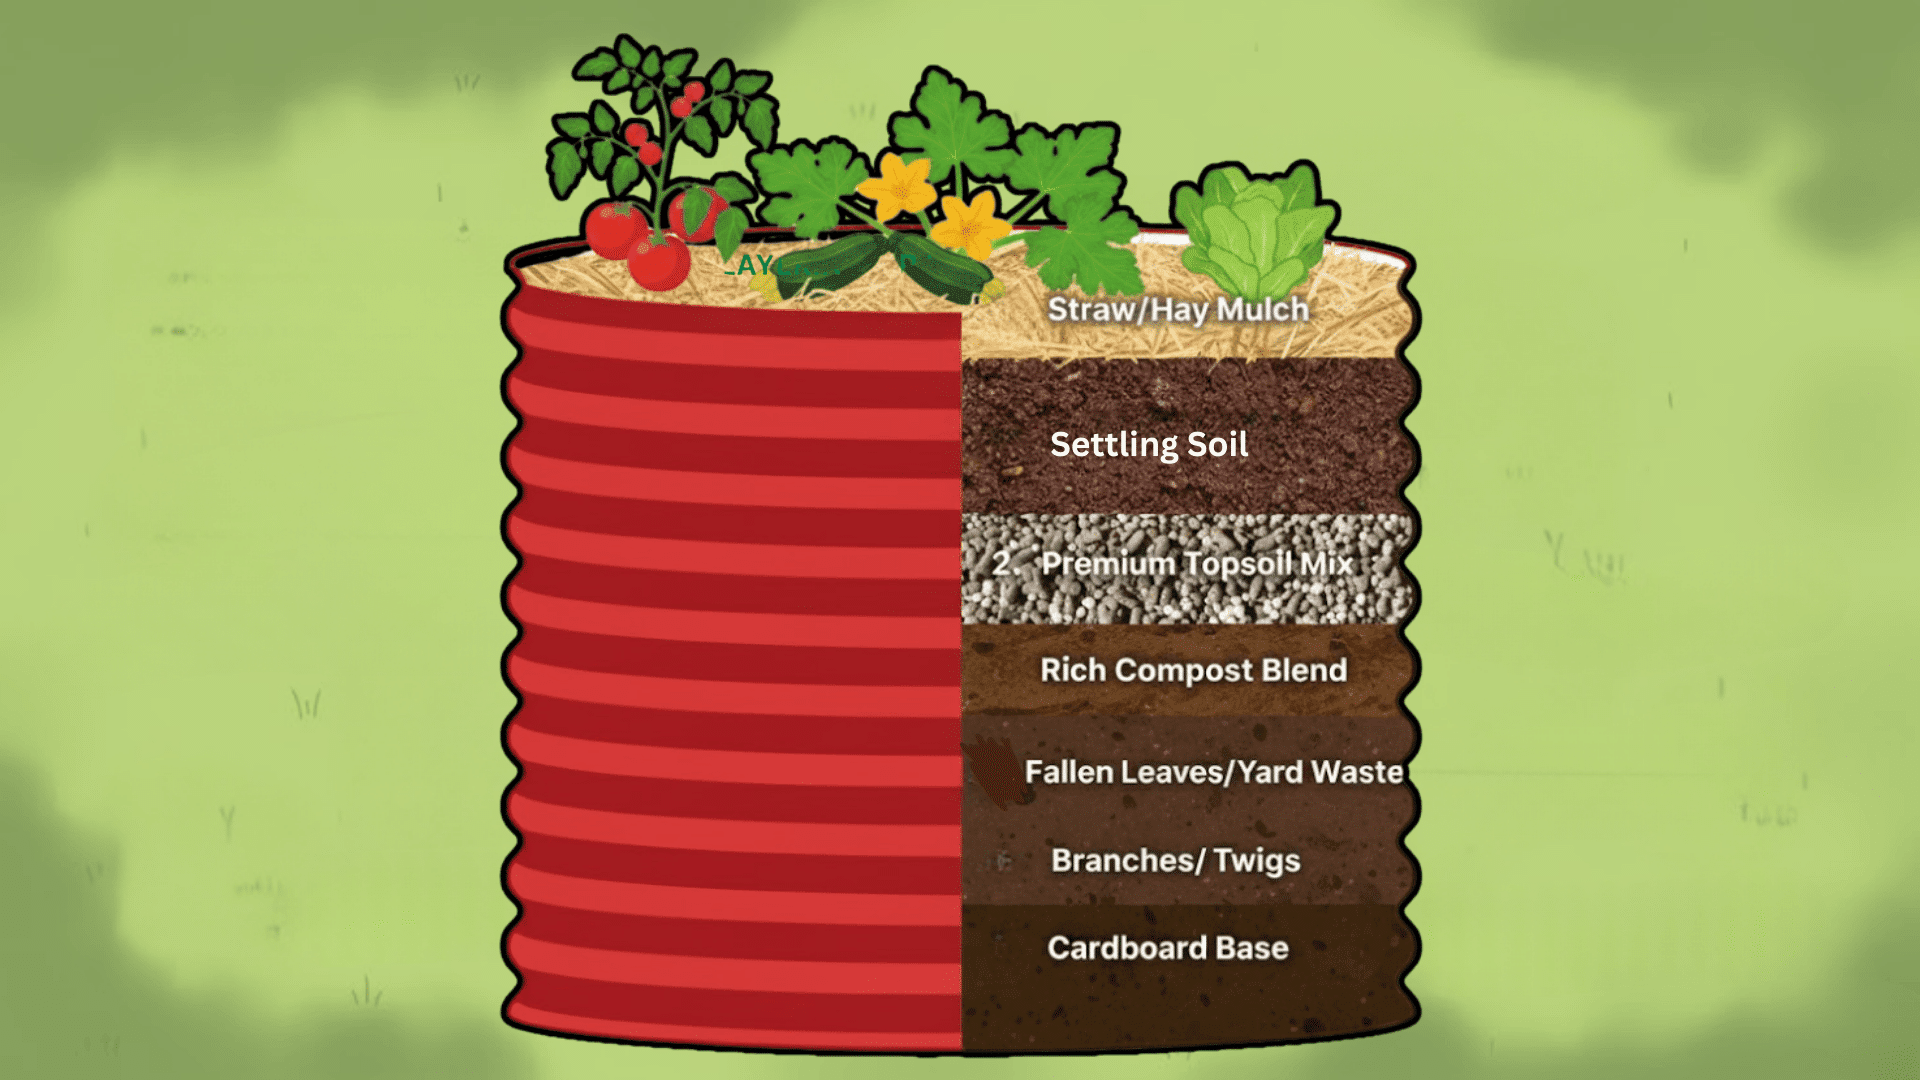
Step 2: Lay the Cardboard Base
Cover the entire bed bottom with layers of plain cardboard or thick newspaper.
I overlap all edges by at least 6 inches to prevent gaps. Avoid glossy cardboard or colored ink since these contain chemicals.
Wet the cardboard thoroughly until completely soaked. This keeps it flat and starts decomposition. The cardboard blocks weeds while slowly breaking down to feed your soil.
Step 3: Add Bulk Organic Material
Start with 4-6 inches of small branches, twigs, and woody prunings. I break longer pieces into 6- to 12-inch sections for better coverage. This creates drainage and air pockets.
Add 3-4 inches of dry leaves, straw, or shredded paper next. This carbon-rich layer absorbs moisture and breaks down slowly.
Top with 2-3 inches of grass clippings or fresh plant material for nitrogen. Water each sublayer lightly as you build.
Step 4: Add Middle Organic Layer
Spread 4-6 inches of finished compost over the bulk materials. Good compost smells earthy and crumbles easily.
Add 1-2 inches of aged manure on top. Make sure it’s aged at least 6 months to avoid burning roots.
Gently mix these layers together with a garden fork. Water thoroughly until moisture seeps through to the lower layers.
Step 5: Add Topsoil Layer
Fill the remaining space with 6-8 inches of quality topsoil. I personally choose organic garden soil that drains well but holds some moisture.
Mix in some compost from below to blend everything smoothly. Leave about 2 inches of space at the top.
Spread 2-3 inches of mulch over the topsoil as your final layer. Wood chips, shredded bark, or straw all work well.
Step 6: Settle and Water the Bed
Soak all the layers of the diy raised garden bed completely with a gentle spray. This takes 20-30 minutes, depending on bed size.
Let the bed sit for one week before planting. The layers need time to settle and begin breaking down. Height will drop 1-2 inches as the materials compact.
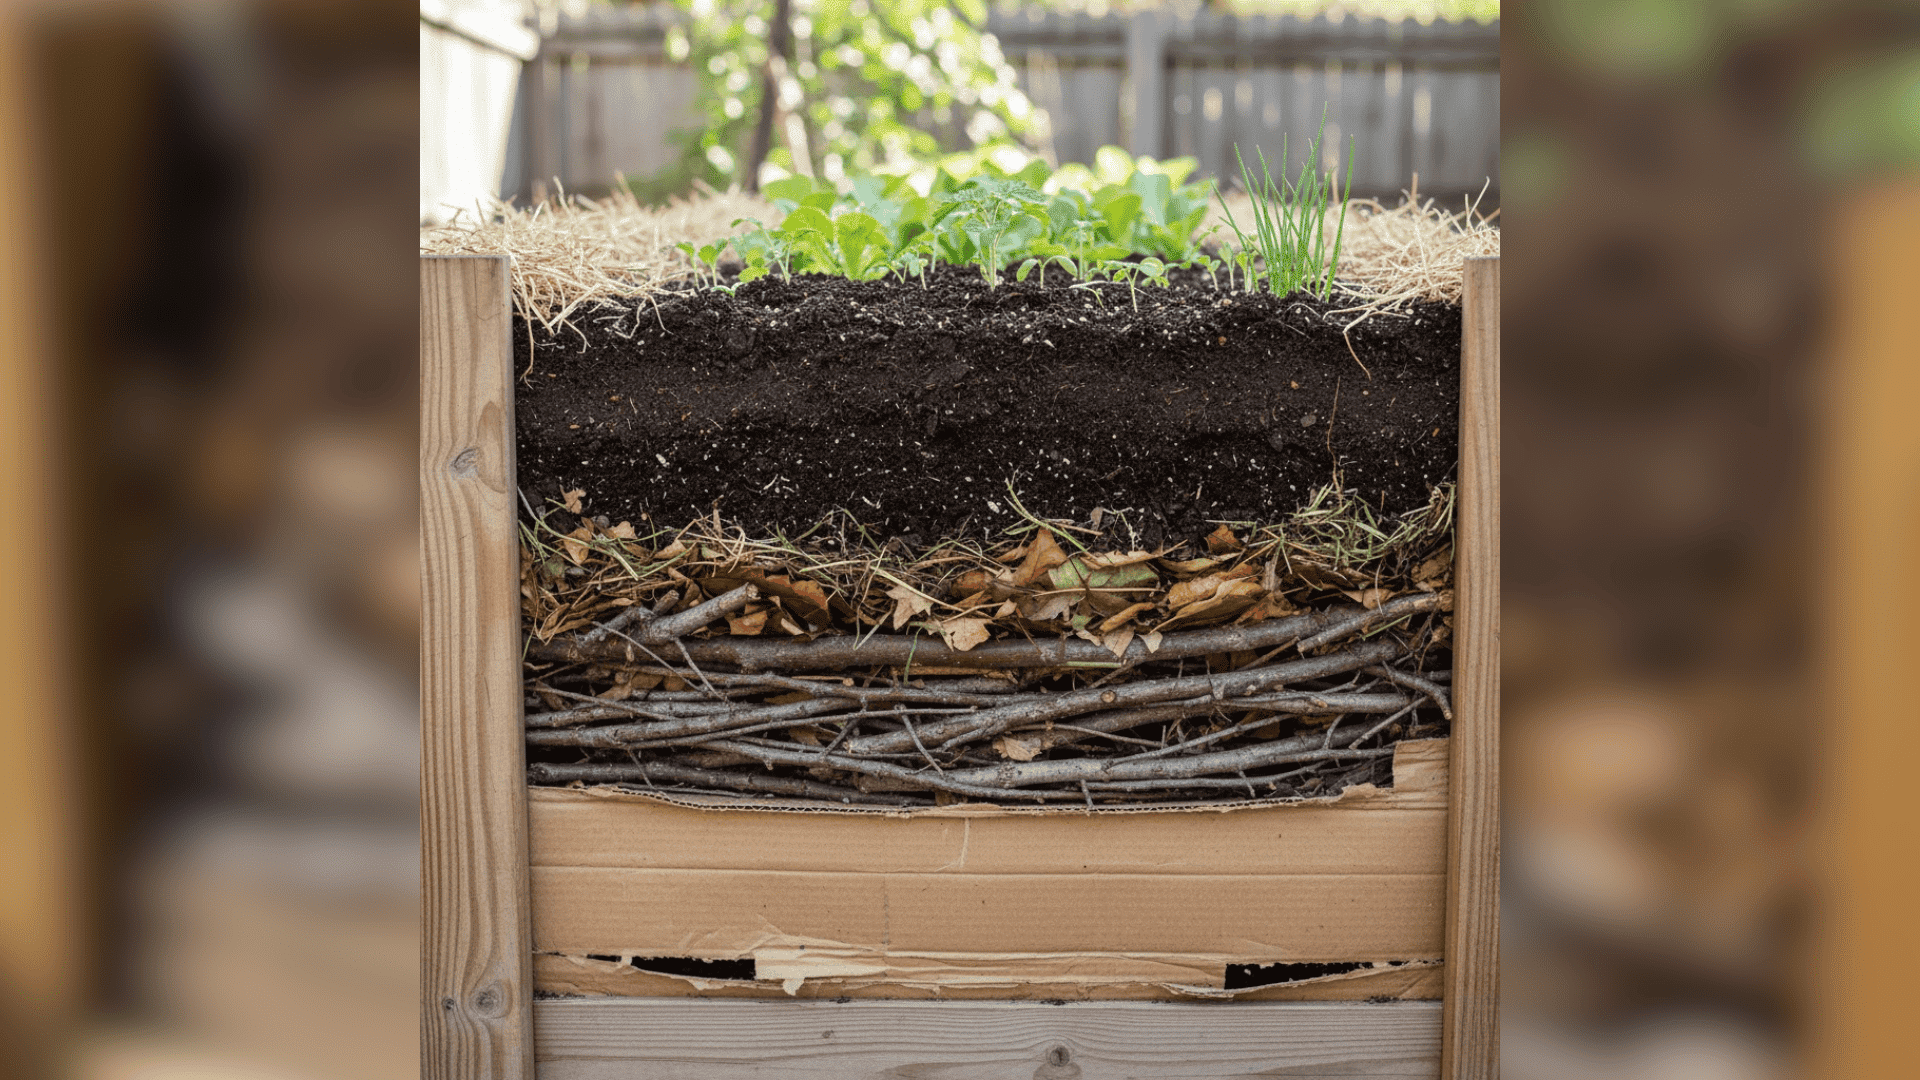
I add more topsoil if needed to bring the level back up. Your diy raised garden bed layers are now ready for planting healthy, productive crops.
This is the final look of a properly built raised garden bed with all layers in place.
Tips for Building DIY Raised Garden Bed Layers
Getting the layers right makes a huge difference in garden performance.
These tips help you avoid common mistakes and set up your bed for success.
- Start with the right bed depth
- Don’t skip the weed barrier
- Water between layers
- Use what’s free first
- Let it settle before planting
- Avoid fresh manure
- Build in the fall for spring planting
- Add nutrients annually
- Check drainage regularly
Conclusion
I always recommend starting with what you have available.
Free materials like leaves and branches work just as well as expensive products.
The key is getting the order right and letting everything settle before planting.
Your layered bed will produce healthy vegetables for years with minimal maintenance. Just add fresh compost each spring and watch your garden thrive.
Why not start today? I suggest grabbing some cardboard and starting your first layer today.